

The AEPS Recording System
Recording Professional Educational Videos Doesn't Have to Be Complicated.
The goal isn't to create perfect videos.
The goal is to consistently create authentic educational videos that help consumers understand estate planning while building your long-term educational library.
Every Contributing Attorney develops a different presentation style. This page will help you find the approach that works best for you.
The AEPS Editorial Philosophy
Every educational video is designed around one simple principle:
Answer the consumer's question as clearly and naturally as possible.
Rather than creating traditional marketing videos, AEPS is building a long-term educational library that helps consumers understand estate planning while showcasing the knowledge and professionalism of experienced estate planning attorneys.
The attorney's expertise is demonstrated through the quality of the explanation itself. Rather than relying on self-promotion, AEPS builds trust by delivering clear, practical educational content. Over time, consumers come to recognize both the attorney and the AEPS brand as trusted sources of state-specific estate planning guidance.
The AEPS Recording Process
Creating educational videos is simple.
Choose Your Next Video
Start with one of the topics AEPS has recommended for you, or browse the AEPS Educational Series Library and choose another Video Kit you'd like to record.
Choose Your Preparation Style
Select either a Simple Outline, Speaker Notes, or a Ready-to-Record Script.
Record Your Video
Record naturally using the preparation style that feels most comfortable.
Upload Your Recording
Upload your completed recording to your AEPS Dropbox folder.
What Happens Next?
After you upload your video, AEPS will:
remove filler words and unnecessary pauses,
improve pacing,
enhance eye contact when appropriate,
improve audio quality when needed,
create professional thumbnails,
produce multiple YouTube Shorts,
publish the content,
and integrate it into your state educational library.
This allows you to focus on teaching while AEPS handles the production and publishing process.
Once you've completed this process a few times, recording several videos in a single afternoon becomes surprisingly easy.
Your 90-Day Content Plan
The hardest part of creating educational content often isn't recording the video. It's deciding what to record next and making time to keep doing it.
AEPS helps with both.
At the beginning of each 90-day period, every Contributing Attorney selects a realistic content goal:
2 videos per month — 6 videos over 90 days
4 videos per month — 12 videos over 90 days
6 videos per month — 18 videos over 90 days
Choose a goal that is realistic for your practice and schedule. The objective is not to produce the most videos. The objective is to establish a commitment you can realistically keep.
You Don't Have to Record Every Month
You may record throughout the quarter or batch several videos during one recording session.
If you record 12 videos in one afternoon or during an AEPS Content Intensive, those videos can supply several months of educational content. AEPS can schedule and publish them over time to maintain a consistent educational presence.
The goal is consistent publishing and meaningful participation—not a rigid weekly recording schedule.
AEPS Helps You Decide What to Record
You do not have to continually come up with video ideas on your own.
AEPS will recommend topics based on:
questions consumers are asking,
topics performing well across the AEPS platform,
gaps in your existing educational library,
issues that are particularly important in your state,
and stories or experiences from your own practice that can teach an important lesson.
Recommended topics and Video Kits are available in the AEPS Educational Series Library.
Depending on the topic, your Video Kit may include a Simple Outline, Speaker Notes, or a Ready-to-Record Script so you can prepare in whatever way feels most natural.
Keeping Your Content Plan on Track
AEPS will privately track progress toward your 90-day goal.
If you fall behind, the purpose of our check-in is not to pressure you. It is to determine what is getting in the way—topics, time, recording logistics, or something else—and help you get moving again.
Your practice will occasionally get busy. That's expected. What matters is maintaining an active educational presence over time and communicating when your circumstances change.
You bring the knowledge and experience. AEPS helps provide the topics, structure, production support, and publishing system that turn that knowledge into a growing educational library.
Choose Your Preparation Style
Every Featured Attorney has a different presentation style.
Choose the preparation method that feels most natural to you. There is no right or wrong choice.
Many attorneys begin with Ready-to-Record Scripts and gradually transition to Speaker Notes or Simple Outlines as they become more comfortable recording.
Option A — Simple Outline
Best for: Attorneys who enjoy speaking naturally with minimal notes.
You'll receive a short outline highlighting the major concepts to cover, allowing you to explain the topic in your own words and presentation style.
Choose this option if you already feel comfortable presenting educational information without detailed notes.
Option B — Speaker Notes
Best for: Attorneys who want additional structure while still speaking naturally.
Speaker Notes expand each outline into organized talking points with suggested transitions and explanations, while leaving plenty of room for your own examples and personality.
Many attorneys find this provides the ideal balance between preparation and flexibility.
Option C — Ready-to-Record Script
Best for: Attorneys who prefer maximum preparation.
Ready-to-Record Scripts are written in a conversational style and are designed to sound natural when spoken.
You may personalize the wording however you'd like, or simply use the script as written.
Many Featured Attorneys find this is the fastest way to record several educational videos during a single recording session.
Which Option Should I Choose?
If this is your first recording session, don't overthink it.
Choose whichever option makes you feel the most comfortable.
Remember, consumers aren't evaluating whether you memorized a script.
They're looking for a knowledgeable attorney who explains estate planning in a way that's easy to understand.
As you record more videos, you'll naturally discover which preparation style works best for you.
My Recommendation
If you're unsure where to begin, start with the Ready-to-Record Script. After recording several videos, you may find that Speaker Notes or even a Simple Outline becomes all you need.
Using Notes While Recording
One of the most common questions attorneys ask is:
"What's the best way to use my outline or script while recording?"
There isn't one "correct" method.
Over the years, I've successfully used several different approaches. The best method is simply the one that allows you to comfortably and consistently record educational videos.
My Recording Methods Over the Years
My recording method has changed over time, but the goal has always been the same: create helpful educational videos as efficiently as possible.
• 2016–2021: One-page outline taped beside my iPhone
• 2022–2023: Teleprompter with iPad
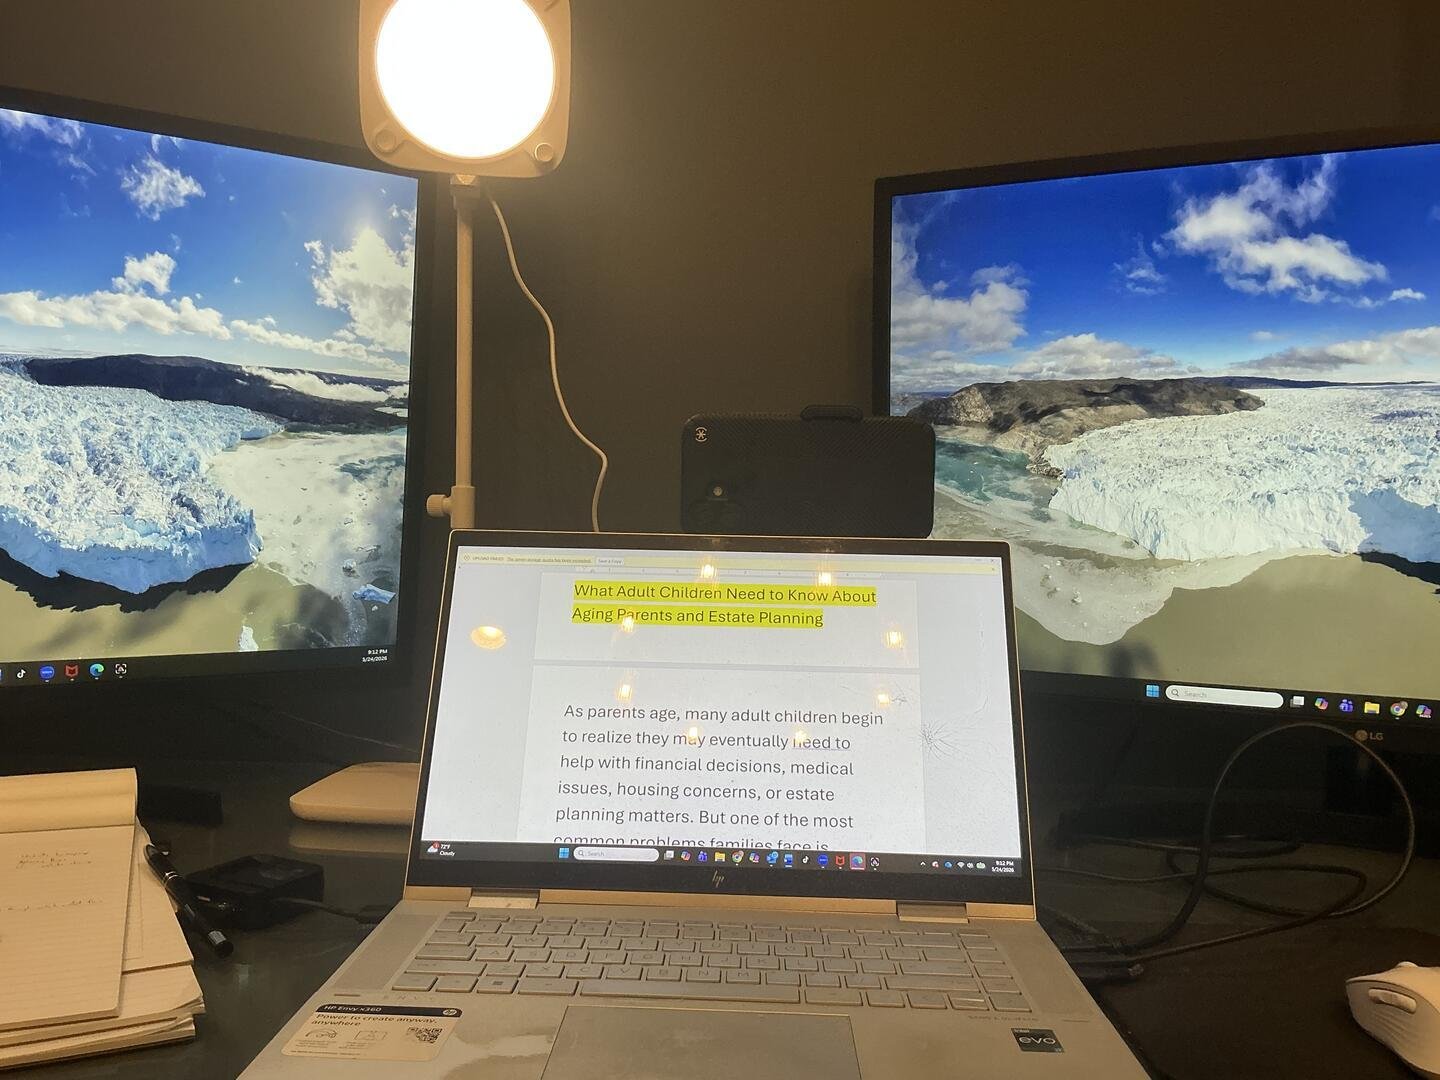
• 2024–Present: Laptop beneath my iPhone using Microsoft Word in full-screen mode
The lesson isn't that one method is better than another. The best method is simply the one you'll actually use consistently.
Method 1 — Outline Beside the Camera
For many years, I simply taped a one-page outline next to my iPhone using Scotch tape.
Many of those videos have gone on to receive hundreds of thousands of views.
This approach works well if you're comfortable speaking naturally from a simple outline.
Method 2 — Teleprompter
For a period of time, I used a teleprompter with an iPad.
This worked well for presentations where I wanted to closely follow a prepared script while maintaining direct eye contact with the camera.
Teleprompters can be an excellent option, but they are certainly not required.
Method 3 — Laptop Below the Camera
Today, I usually place my laptop directly beneath my horizontally positioned iPhone.
I display my script in Microsoft Word using full-screen mode so the top of the document sits immediately below the camera.
Because the script is so close to the lens, I can comfortably follow my notes while maintaining natural eye contact with the viewer.
This has become my preferred recording method.
The Best Method Is the One You'll Actually Use
Some Featured Attorneys speak from a simple outline.
Some prefer Speaker Notes.
Some use Ready-to-Record Scripts.
Some print their notes.
Some use teleprompters.
All of these approaches can produce excellent educational videos.
Don't worry about finding the "perfect" recording method.
Choose the method that helps you consistently create educational content.
Technology Makes Recording Easier Than Ever
Don't wait until you have the "perfect" recording setup.
Most Featured Attorneys can create excellent educational videos using only a modern smartphone.
AEPS uses professional editing tools that help improve the finished product.
Eye Contact Enhancement
If you occasionally glance down at your outline or script while recording, our editing software can often improve eye contact so your presentation appears more natural.
This means you can comfortably follow your notes without worrying about looking away from the camera every few seconds.
Studio Sound Enhancement
Professional microphones can be helpful, but they aren't required to create excellent educational videos.
Most Featured Attorneys can produce clear, professional-sounding audio using only a modern smartphone. Our editing software can often enhance smartphone audio, so don't feel like you need to invest in additional equipment before recording your first videos.
If your office has significant background noise or you're recording in a larger room, an inexpensive wireless lavalier microphone may improve audio quality—but it is entirely optional.
The most important thing is to begin recording. You can always upgrade your equipment later if you choose.
Recording Tips That Increase Viewer Engagement
Consumers aren't judging your video like a television producer. However, a few simple recording habits can make your videos feel more engaging, more educational, and easier for AEPS to edit and publish consistently.
Begin with the Topic
With the exception of your introductory "Meet Your State Estate Planning Attorney" video, begin directly with the consumer's question or topic.
Rather than introducing yourself at the beginning of every educational video, immediately start explaining the issue the viewer came to learn about. AEPS will identify the presenting attorney through the state hub, YouTube description, and the closing of each educational video.
Use a Natural Closing
At the end of each educational video, briefly:
Thank the viewer for watching.
Identify yourself as the presenting attorney.
Invite viewers to visit your state page on EPSeries.com for additional educational videos and resources.
The wording does not need to be identical from video to video. We encourage attorneys to use their own natural speaking style while consistently including these three elements.
Center Yourself in the Frame
Record horizontally (16:9).
Position yourself so that:
your nose is approximately centered in the frame,
there is roughly equal space on both sides,
your eyes are about one-third of the way down from the top of the frame,
and the camera captures you from approximately mid-chest to just above your head.
This framing allows AEPS to easily create high-quality vertical YouTube Shorts while keeping you centered on the screen.
Position the Camera at Eye Level
Looking directly into the camera creates a stronger connection with viewers and produces the most natural results after editing.
Keep Your Hands Free
Natural hand gestures help emphasize important points, but avoid holding pens, glasses, phones, clickers, or other objects that may distract viewers.
Keep the Background Simple
Bookshelves, diplomas, artwork, or tasteful office décor work well. Try to minimize clutter or distractions behind you.
Dress Naturally
Dress as you normally would when meeting with estate planning clients. Professional attire reinforces credibility while allowing your personality to come through.
Smile Naturally
A relaxed, friendly expression helps viewers feel comfortable learning from you.
The Most Important Thing
Don't let technology become an excuse to postpone recording.
Consumers care far more about receiving clear, trustworthy guidance than they do about perfect production quality.
Your educational library grows one video at a time.
Viewer Questions Can Become Future Videos
Comments on AEPS videos often reveal exactly what consumers want to understand next. AEPS may forward substantive viewer questions to you. You may respond directly, or, if the issue deserves a fuller explanation, use the question as the basis for a future video.
A Few Final Tips
Don't wait until you have the perfect equipment, the perfect office, or the perfect presentation.
Start recording.
If you make a mistake, pause briefly and begin the sentence again. Continue recording. AEPS can usually remove mistakes during editing, so there is rarely any reason to restart an entire video.
Don't worry if you occasionally glance at your notes. Our editing tools can often improve eye contact, allowing you to comfortably record from an outline or script while maintaining a natural appearance.
Don't wait until you've invested in expensive recording equipment. A modern smartphone is usually all you need to get started, and our editing tools can often enhance audio quality as well.
Whenever possible, record several videos during the same recording session. Once your equipment is set up, you'll often find that recording additional videos becomes much easier.
Most importantly, remember why you're doing this.
Consumers aren't looking for television-quality production. They're looking for a knowledgeable attorney who explains estate planning clearly, honestly, and naturally.
Every video you record becomes a permanent educational asset.
Every month your educational library grows.
Every year more consumers discover your educational content before they need an estate planning attorney.
That's the power of building your educational library one video at a time.